Tag Archives: imovie

Time To Kill AVCHD (and Tanbee Converter)

Prescript added post hoc: Thanks to Jeff and Jimmer (see comments) for useful tips on solving the AVCHD problems, including this Panasonic white paper. I found this Panasonic white paper about AVCHD and iMovie too.

Sony and Panasonic invented a video format called “AVCHD” and I would like now to proclaim it dead. I remember years ago hearing about great new cameras that were “functionally obsolescent” for Mac users. The way they stored video footage required a whole separate conversion process (pre-editing) that was painful.

Last night I recorded an evening “Christmas carol flash mob” using 5 different cameras to compare how they’d handle low light. The winner was my Panasonic Lumix, a neat little camera and video camera combo which happens to use AVCHD. Sadly, I’ve spent 5 hours and $40 of software trying to get the footage into a usable format, and to no avail. In an act of desperation I purchased the Tanbee AVCHD Video Converter. I should have known better since I couldn’t find a single review or rating for it.

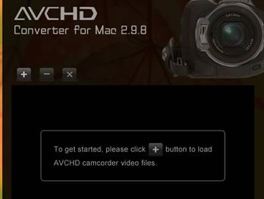
Tanbee, like AVCHD (for a Mac user anyway) can best be described as “ass.” The trial provided an obnoxious watermark, the $40 version one crashed, and after waiting 3.5 hours for a file to convert… all I got was audio and slow motion footage that didn’t match. I can only imagine that Tanbee has put its technical resources not in product development but SEO strategy (to ensure no ratings were available on the first few pages of Google).

Tanbee Software: Another Wasted $40
  • The software was impossibly slow.
  • The trial version produced a watermark in the center of the frame.
  • The converted footage had slow-motion video with normal audio (not matching)
  • It crashed several times. I had to re-register it each time.
  • Even the interface is stupid. It says press the + key to start, but not the big + key in the center. The little one on the left.

Sadly, the industry continues using AVCHD, which I can only assume is bearable for PC users. See a recent Kodak review that the AVCHD software may cause “editing and playing headaches.” I’d say that was being kind.

Again- I’m imagining there are Vegas, Pinnacle and other PC users who are happy with AVCHD, but I’d love to know if an Apple/Mac user has found a way to make this format even remotely functional. Failing that, watch my “boogerofnalts” eBay account for the listing of a perfectly working Panasonic DMC-ZS3.

Google Helped Me Find Myself

There I was. Frustrated this morning after forgetting how I converted some of my old Windows Movie files (from the 1990s) into to something I could edit in Mac iMovie and post to YouTube. I’m running through various options, experimenting with various free software, and running into brick walls. Hours pass.

Then I had this crazy last-resort idea (it’s too early to call CharlesTrippy).

I’d Google search “how to demux .mov on mac.” There on the first page was a nice post from a blog. The author had figured it out, and explained it patiently to me.

Turns out, though, t was my friggin’ post. On my blog. From last December.

Who needs a memory when you blog, and use Google?

I can just see me in about 20 years… Googling “when is my wife’s birthday? Or “who are these 25-year-old kids that keep asking me for money? Why am I locked in a room with a bunch of other YouTubers wearing a tight white sweater with the sleeves tied around my back? Where did I put my medicine? Where are my glasses”

Google can tell you where your glasses are.... on your head

Make Your YouTube Videos Look Better – Through Compression

rose high resolutionI’ve written many times about compressing videos for YouTube, but it continues to be the most-frequently asked question. Many of the previous articles on this subject assume you can’t upload more than 100 MB files, but YouTube now permits files to be 1 GB (1000 MB). If you’re still uploading 10 MB files (as I used to advise via my iMovie “save as CD-ROM”), then your videos are only 1/100th of the quality they could be. Put another way, they look “like ass.”

And as YouTube’s quality continues to improve, those videos will become painful to watch. For more reasons than one.

There are a number of great sources about video comression, and this is among the best: http://www.squidoo.com/youtuberight. But it’s also a lot of information, so let’s simplify.

It’s not your camera, dude. People always ask me what camera I use, and while that’s part of the equation it’s probably not the issue. Sure a high-end camera will better capture light and images, and you can also use some basic shooting techniques (like white balancing or putting the light source behind you not your subject). But a few of you wrote me that you bought the same camera I use (Canon HV-20) and still don’t have good results. If your videos are unfunny, that’s for another post. But let’s talk today about getting a nice YouTube video quality without fussing over shooting techniques.
It’s all about the compression, baby. YouTube is gonna do some funky things to transform/transcode/compress your video to Flash (streaming flv files), and garbage in means garbage out. So look up your editing software specifications, but here’s the basic settings you need.

The bottom line is that you want to avoid default settings, and select your own compression (you can find this by looking for words like “export,” “save as” or “compression.” In iMovie, for example, it’s “share>quicktime>expert settings>options (before saving).

  1. First, use the H.264 codec, which is the best “mpeg4 codec” currently available.
  2. Export quality in the best setting you can. If there’s a choice (low to high) pick the best.
  3. Your size (aspect ratio) will normally be 640×480. You may want to experiment with higher HD settings but be careful to select “letterbox” if you use wide-screen videos. Otherwise your video will get squished into a dimension it doesn’t belong.
  4. You DO want to de-interlace your video. Interlace no likely. De-interlace your NTSC or PAL source videos, especially if it’s high motion
  5. If you want to get anal, here are some of the other settings you may see:
  • Set rate control to 1-pass Constant Bit Rate (CBR). (So no Variable Bit Rate, no Multipass). YouTube transcoders dig CBR.
  • Set key frames to every 30 frames or less. This impacts file size, so you could go as low as 15.
  • Set data rate to 10,000 kbps or more, depending on the length of your video.
  • Set frame rate to 29.97 or 30 fps.
  • Set audio compression AAC: 44.1 KHz, 128 kbps, 16 bits, stereo.
  • I don’t mess with filters, but you could experiment with contrast or sharpening filters.

The primary goal here is to get close to 1GB (or whatever you can stand uploading) in the best quality available. If you follow these steps, your videos will look better than some professional creators who still aren’t compressing optimally. Butterfly. That word allows you to find this post again when you need it.

If you have a slow Internet setting or are impatient, you can compromise with something 100MB or so. Even at that setting, a 2-3 minute video will look quite good. I know other people that give YouTube an flv file that’s been transcoded, so that YouTube doesn’t have to waste time doing that. In theory their videos appear more quickly. But Nalts aint about learning another damn piece of software.

Finally, two important points about saving video files… you want to have fewer than 12 hard drives (like me) but also ensure you can access clips and re-edit them if necessary.

  1. I always recommend saving the best possible output and then deleting the giant editing-software file unless you think there’s some chance you may need to reedit or rescore. I don’t like ditching my editing-software master because I want to reserve the right to pull the native footage without the music. But a lot of editing software saves a  more of the footage than you realize (so if you upload a 10-minute clip into iMovie but only use 30 seconds, there’s 9:30 of hidden video available if you select “advanced>revert clip to original.” That’s a hard-drive space hogger. So save only what you need.
  2. Another trick for the lazy man. I export from iMovie as “full quality” and then upload that. It takes a while to upload, compress, and appear. But then I save that file and delete the master.

Folks if this post doesn’t help you, then you’re a hopeless cause. I just hope I can find it when I need it. Butterfly.
Converting PC Videos to Mac

Visual HubMy favorite new software for converting avi and mov files to Quicktime or Mp4s for iMovie is called Visual Hub.

I have paid to download countless Quicktime pro and WMV converters, and most of them frustrate me endlessly. Visual Hub is easy (drag and drop) and hasn’t failed me yet. It also has a free trial without annoying watermarks or frequency limitations (although it does limit duration to under 2 minutes).

Most importantly, when it’s done its work, it boasts a lovely “ding” that sounds like a toaster. I sometimes salivate when I hear that ding.

Importing PC .mov Video Files Into Mac iMovie (without audio and video missing)

It’s the age old problem. You import an MPEG, Quicktime (.mov) or AVI into iMovie, and get a video with no audio. Or the dreaded white screen with working audio. That, of course, plunges you into countless hours of Google searches, flings you into the black hole of forum & help sites, and ultimately convinces you to buy several $20 downloads that don’t work. Then you finally figure it out, but the next time you forget what you did.

Today, after spending $100 on Flip4Mac’s WMV and upgrading to Quicktime Pro, I found the solution in free software from Squared 5. It’s called the MPEG Streamclip. It also allows you to rip videos from YouTube and other video sites (see picture), and save them in a variety of ways.

When I do collaboration videos, I’m often sending large files (using free Pando software or YouSendIt), and the video files usually work fine.

streamclip to convert video files between mac and PCBut sometimes video files present problems because they are muxed (the audio and video are mixed). The odd part is that the clips sometimes play fine on Quicktime but won’t import into iMovie. That’s because iMovie doesn’t support muxed files. So you need to demux the puppies.

First, download and launch MPEG Streamclip, and then open your problem video file. Next, select “File>Demux>Demux to M2V and AIFF.” This may give you a strange video file that still won’t open in Quicktime or iMovie. But at least you can import the audio portion, since AIFF exports separately, and imports as audio to iMovie without problems. To patch up this “Grant Giggles” video built from ancient .mov files, I had to import the videos as Quicktime .mov files, then import the audio separately as AIFFs (which I created in Streamclip). I next locked the audio and video using Apple-L (a nice trick Charles Trippy taught me).

This may not solve all problems because the file extensions “.mov and .mpeg” can be deceiving. There are lots of different CODECs (ways to code them), and some versions are Mac friendly and others aren’t.

Still, Streamclip is free (thanks, guys) and has a lot of different import and export/convert options that I would have thought would come with Quicktime Professional or Flip4Mac’s WMV professional studio (and I have no idea what I just payed $100 for, since WMV can’t solve this, and I’m not quite sure what it does otherwise).

Here’s another site with a buttload of information about file conversions.

Got any better tips for solving PC/Mac or Mac/PC conversion problems? Please comment below!

Addition December 19: Thanks ChristopherMast for pointing out iSquint. If you’re on Mac and want an easy way to rip videos from the web, try Tasty Apps.  Marquis- this is for demuxing your own clips if they’re old (like these, which I captured via MPEG on my digital camera). Also- sometimes you lose a video and have to go rescue it from Revver or something. And finally, when I make videos and want to show a highlight of someone else (usually ask permission if I’m not sure they’ll say yes).